When the cold weather kicks in and the first snowfalls of the year cloak the backcountry in its winterly garb, many outdoors-goers are apt to condemn their camping kit to a store cupboard until the return of more clement conditions.
Not all, however, and those who choose to carry on getting their camping fix in the year’s colder months reap many very worthwhile rewards: uncrowded campsites, quieter trails, the opportunity to pretend they’re a small tribe of White Walkers or Wildlings from Game of Thrones, and that super-snug, cocoon-like feel of being cozied up inside a tent while the worst conditions the weather gods can throw at you rage outside.
On a personal note, some of my most enjoyable experiences camping have happened during the winter. Two particular occasions come to mind: the first a single overnighter in the Italian Alps when I just needed a break from all the hassles and troubles of life in the city; the second during a particularly chilly January in Yosemite National Park.
Both occasions were particularly kind to me, grant both a heightened sense of self-reliance and an experience of wilderness I surely wouldn’t have found had I been in either location during more temperate months.
Many of my summer camping trips are now beginning to ebb in memory, but every winter trip I’ve made has been so unique, life-affirming, and exhilarating as to be truly unforgettable.
Not yet convinced?
We didn’t expect so…! In the following article, however, we aim to work our powers of persuasion, bringing you a thorough guide to winter camping for those keen to make the jump from regular, warmer-weather camping to the more extreme kind.
Our aim?
To equip you with all the know-how and skills you need to keep your camping adventures going long after the thermometers start taking their annual turn south.
Before we get down to all that, let’s start with a quick look at what this winter camping business is all about.
Winter Camping – What is it?
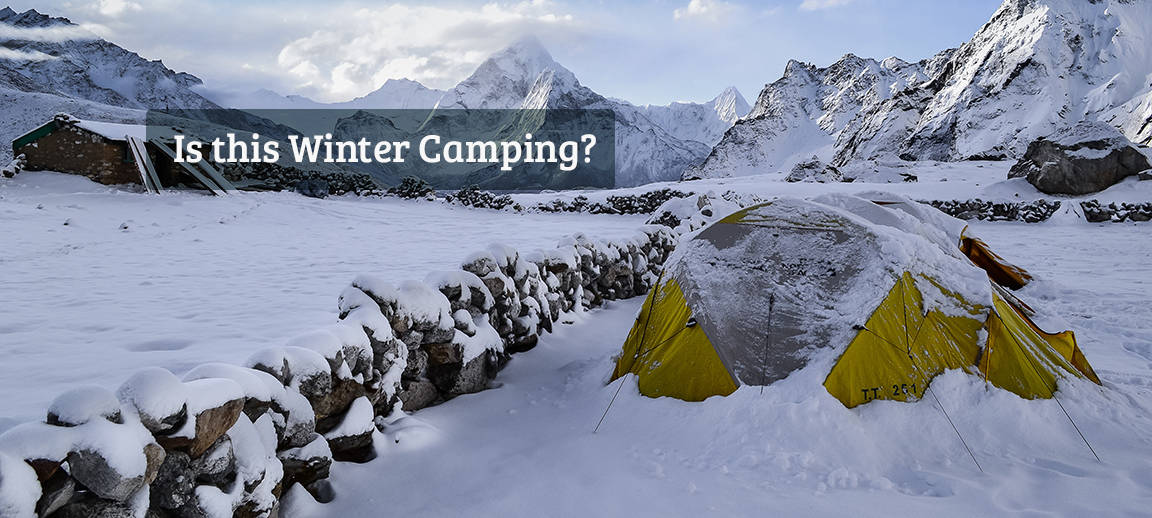
For an overnighter in the wild to be classified as a bona fide “winter” camp, one very simple criterion needs to be fulfilled: the presence of snow.
While the intuitive (and logical) thought is to assume that winter camping is determined by the season in which you do it, it’s in fact the doing it in the white stuff that matters. A more accurate designation, in fact, might be “winter condition camping”, but that just doesn’t have quite the same ring to it, does it?
Also, winter conditions vary wildly across the globe — camping in January in Alaska, for example, is more likely to yield true winter conditions than in Florida, Portugal, or other more southern and temperate locations in the same month.
This distinction is important to the following guide, all of which is aimed at preparing you to get your camp on in more extreme conditions and in the presence of snow.
Now that that’s settled, let’s take a quick peek at why you might want to give winter camping a try.
Ten Reasons Winter Camping is Wonderful
- Lower Campsite Charges
Camping in the off-season is usually far cheaper than busier months if you’re using established, paid campsites - Quieter Campsites
And there aren’t so many people around to disturb your sleep or kill your Zen - Quieter Trails
No crowds here either… - Snowshoeing is Great Fun
It really is. You may look like an oversized, slightly awkward duck, but it’s a hell of a lot better than being a human who’s thigh deep in huge accumulations of ice crystals and going nowhere in a hurry. - A Different Perspective
Landscapes take on a whole new look when clothed in their winter attire. Even those that are somewhat bland the rest of the year can take on a Narnia-like appearance with just a light dusting of the white stuff. - No Bugs
They’re sleeping. - No Bears or Snakes
As are they… - It’s Great for Getting Rid of the Festive-Season Gut…
…in a far more fun, healthy, and adventurous way than hitting the gym. - Earn Yourself Some Serious Kudos Among Fellow Campers
They’ll think you’re a legend. Expect red carpets at future camping meets and the addition of the title “Badass” to your name (i.e. “Badass Brian”). - Snow!
Considering it’s little more than an accumulation of frozen ice crystals, is very cold, and somewhat dangerous, the white stuff is remarkably fun and pretty to look at.
Three-Season Camping Vs. Summer Camping Comparison
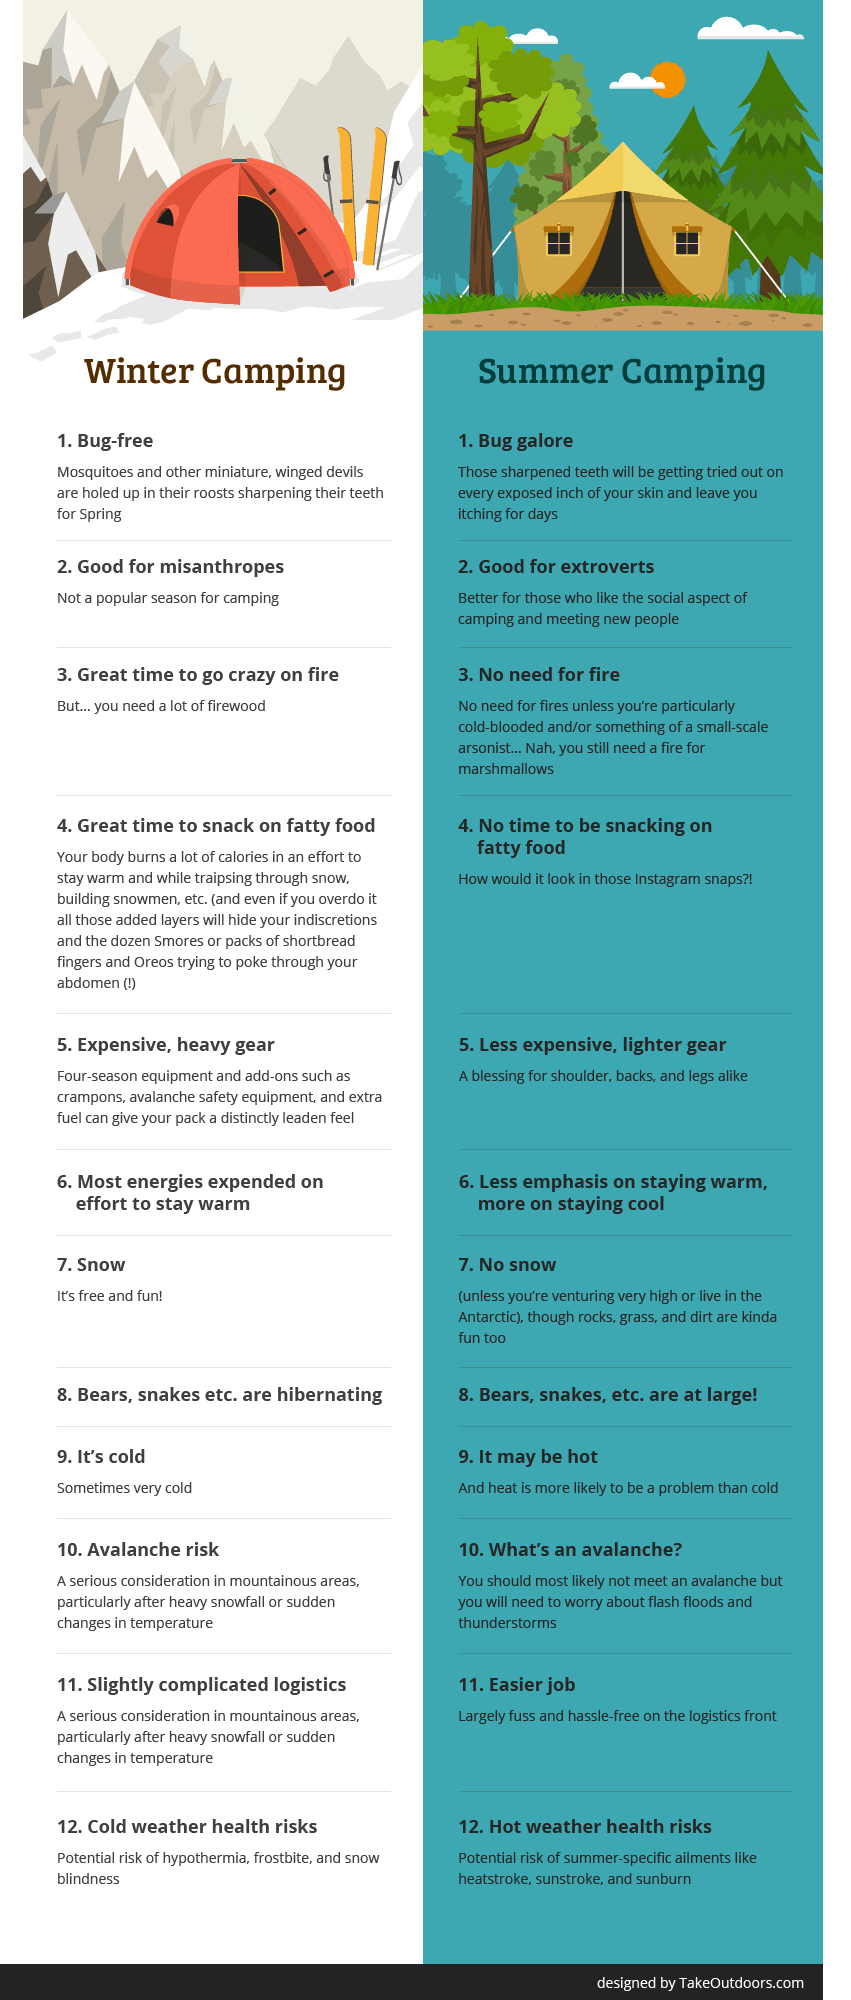
Now that we’ve covered the basics with a more lighthearted look at the differences between regular camping and winter camping, let’s put on our serious faces for a few minutes while we run through the more grave and grim aspects we need to take into account before venturing out to lose our winter camping virginities — we wouldn’t be doing our duty as conveyers of crucial camping wisdom without it.
You’d better take a seat…
Temperatures
While this may seem like a no-brainer, many first-time winter campers are taken aback by just how chilly it can get in the year’s cooler months, particularly at night. The take-home from this observation is this:
Cut no corners and take every feasible measure to ensure you’re going stay warm for the duration of your trip, particularly on your first few outings. The temperature swing between summer nights and winter nights can be huge. As such, we’d suggest breaking yourself into winter camping gradually by first taking some shoulder season trips to acclimatize yourself to colder conditions.
Conditions
Cool temps, sadly, rarely come alone. Their entourage is composed of further elements of meteorological mischief that can make life all but unbearable if you’re unprepared. This entourage can take varying forms, but in most portions of the globe manifests in falling snow, lying snow, ice, sleet, rain, and driving, frigid winds.
Each of the above calls for adequate equipment to mitigate the threat posed and we’ll take a closer look at the kit required to keep you safe below. For now, we’ll leave you with the short version, which is something we like to call The Cardinal Quaternity of Winter Camping: weather protection, insulation, safety, efficiency (WISE).
[su_list icon=”icon: chevron-right” icon_color=”#ce6d39″]
- Weather Protection — “Bombproof” tent, waterproof clothing, and boots
- Insulation — Sleeping bag, sleeping mat, and meaty midlayers
- Safety — Crampons, ice-ax, snow shovel, avalanche probe, avalanche beacon
- Efficiency — Knowing how to use each of the above appropriately and to maximize their effectiveness
[/su_list]
Costs
Winter camping isn’t cheap. Assembling the kit that will keep you safely protected from the elements and warm on your trips requires some serious investment, as not only will your standard, warm-weather gear not cut it in the cold, but winter clothing and camping kit tend to be a lot pricier, too. On the ‘plus’ side, any gear you do buy is more likely to be tougher built to deal with harsher conditions and so, in many cases, far more likely to last you a lifetime.
Safety
Looking after yourself while winter camping takes a significant amount of know-how and extra vigilance. While many of the mistakes you might make in summer months might result in mild inconveniences (wet feet, lost maps, misplaced matches, for example), winter conditions are far less forgiving and the same mistakes could prove fatal.
Experience
While conditions underfoot maybe mean you’re unlikely to venture as far afield as during summer months, when winter camping you’re sure to find yourself one of few at your chosen camping spot (if not entirely alone), no matter how popular the area. For loners, peace-lovers, misanthropes, or those who just like their scenery served minus the side of multiple others photo-bombing their snaps and generally impinging on the feeling of wilderness, the novelty of winter camping is one that’s both immediately endearing and doesn’t wear off with time.
But…
Do bear in mind that this last-human-on-earth kinda feeling can be accompanied by true isolation, meaning you’re more likely to be a long way from help if you need it and might just go bat-s**t crazy without anyone to speak to but yourself.
Planning and Prep
Owing to the added risks and variables entailed in winter camping, we have to do a commensurate amount of planning and preparation. From resealing tents and renewing DWR finishes on our jackets to checking snow conditions, stocking up on fuel, and researching avalanche-free routes to take on our way to our camping spot, pre-trip to-do lists for winter outings can often run a few pages long.
Know-how
Winter camping requires almost a whole new skill set and degree of degree of smarts compared to summer camping. Some things you might need to learn include:
[su_list icon=”icon: chevron-right” icon_color=”#ce6d39″]
- How to avoid, diagnose, and deal with cold-related ailments like frostbite, hypothermia, and snow blindness
- How to assess avalanche conditions and find a safe route over avalanche territory
- Emergency measures such as digging a snow hole and avalanche rescue
- How to maximize your gear’s water and windproofing capacities
- How to keep yourself warm when temperatures really plummet
[/su_list]
Phew! Now we’ve got that over and done with, let’s move onto our guide to winter camping gear!
Winter-Camping Gear: Kitting Yourself Out for the Cold
As an intro to what’s to follow, let’s start with two charts showing you how cold is it in popular camping destinations in winter time…
Average Nighttime Temperatures in Popular Camping Destinations
Northern Hemisphere
[visualizer id=”3150″]
Southern Hemisphere
[visualizer id=”3154″]
Sources:
- www.usclimatedata.com
- https://en.climate-data.org
- https://www.yr.no
- https://weather-and-climate.com
If the above figures haven’t already convinced you, we’ll reiterate the point now:
Getting the right gear for winter-time camping is absolutely essential.
While in summer months we might get away with cutting a few corners or erring on the “easy-carry” side of things, in winter months the consequences of such a lackadaisical approach could be deadly. Literally. To help you avoid such inconveniences as frostbite, hypothermia, a stinker of a cold, and death, below we’ve included a thorough guide to help you get the gear you need to make winter camping not just non-fatal, but downright enjoyable.
Costs
If you’re new to the game of winter camping, the chances are you won’t want to bankrupt yourself buying new kit before you know it’s going to be something you’re likely to do on a more regular basis in future. Here we find ourselves in something of a Catch-22 situation: we don’t have the gear required to give full-on winter camping a try, and yet using our three-season gear on any experimental adventure is not only risky but also likely to put us off the whole enterprise.
So, what to do?
To get around this conundrum, we’d recommend borrowing or renting winter kit for a few trips before investing in your own kit. If this isn’t possible, try a few nights camping in the shoulder seasons to gain some experience camping on snow, in slightly colder conditions, and in more isolated environments, but without the true shock to the system of diving in at the deep end that is bleak midwinter. Taking this approach will not only give you a taste for things before you take the financial plunge but maybe also save you a finger/toe or two.
Clothing for Winter Camping
Unless you happen to be Wim Hof or that crazy dude we saw last February strolling around the snowy streets of Chamonix in shorts and a vest, then winter conditions mean winter clothing. Choosing the right clothing and using the layering system effectively are crucial to ensuring your winter overnighters are comfortable, safe, and don’t end with an unscheduled visit to the emergency room.
To make sure you’re on the right track, the following guide covers the basics of clothing for winter camping.
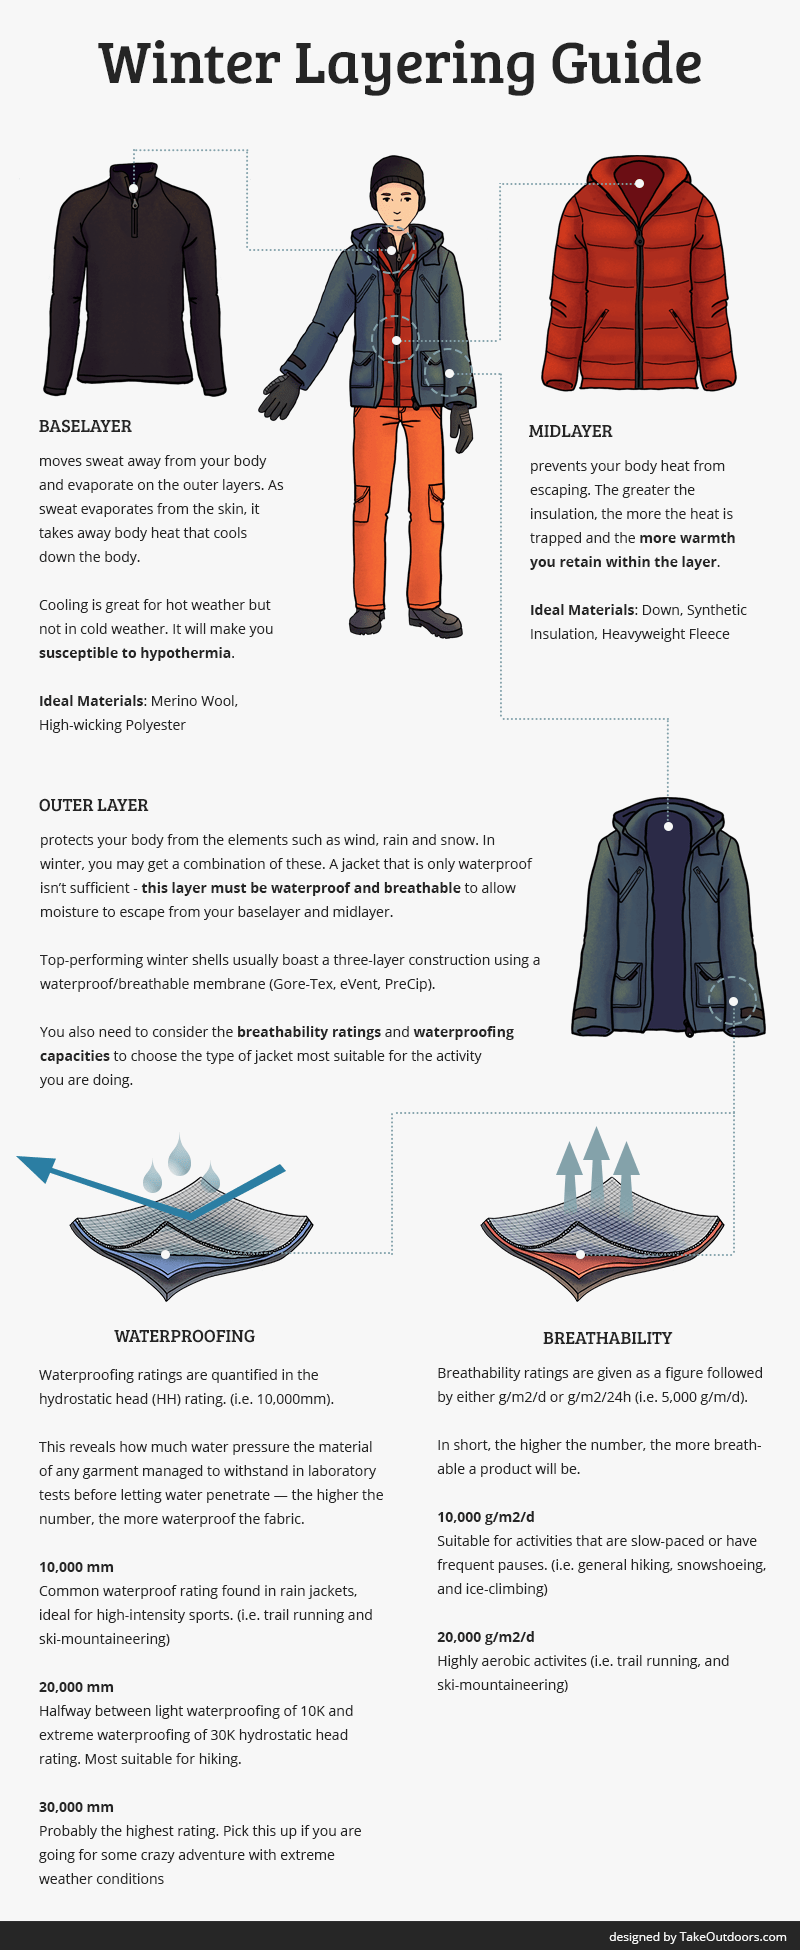
Baselayer
Depending on where you are in the world and just how cold conditions are, the intuitive thought for most winter wanderers is that cooler weather means less need for moisture management, which is, of course, the baselayer’s raison d’être.
Here are a few reasons why it remains as crucial as ever:
- Due to the fact that in winter you’ll be wearing heavier insulating layers and probably a hardshell outer layer, then the chances of working up a significant sweat are just as high as in warmer seasons.
- That sweat can be deadly, and not just because of its less-than-sweet scent. When sweat saturates a layer of clothing, there’s no real danger so long as we’re on the move and still generating enough body heat to keep the moisture warm. When, however, we’re forced to take a break, stop to take photos, or grab a bite to eat and we begin to cool down, however, things can go south very quickly.
According to research from Princeton University, water can conduct heat away from your body up to 27 times faster than air, which makes staying sweat-free with a high-wicking baselayer all but essential at any time of year.
The best baselayers for winter camping, therefore, are not only distinguished by being full-length and thick enough to provide a solid foundation of insulation, but also by being breathable enough and with sufficient wicking capacity to keep you dry throughout the day (a point especially worth noting if you happen to have a long hike into your chosen camping spot).
The top performers in terms of wicking, breathability, comfort, and warmth tend to be baselayers made with merino wool or high-wicking polyester. Products like the Smartwool Merino 250 Baselayer and Icebreaker Tech Pullover are good bets for your top half, while the Smartwool Merino 150 Pants and Icebreaker Oasis Leggings will do the same for your legs, butts, and “bits”.
Midlayer
The midlayer is all about insulation. As with your sleeping bag, a midlayer provides warmth by preventing your body heat from escaping rather than by actively producing heat. As such, the best insulating midlayers tend to be those made with thicker materials that trap warm air but retain a decent degree of breathability in case you happen to work up a sweat.
The ideal midlayer choices for winter campers are puffy jackets with down or synthetic insulation or heavyweight varieties of fleece. How thick and warm you want to go will depend on how cold you anticipate the temperatures will be in your intended camping destination, but to play things safe we’d recommend plumping for down jackets with high-density fills (600-900 fill power), comparable synthetic-filled jackets, and 250-400 g/m2 fleeces.
Outer Layer/Shell Layer
The outer or shell layer is all about protection from the elements. In winter, the potential for encounters with snow, sleet, rain, and wind, or some combination of all four, means that most summer jackets and waterproof pants just aren’t going to cut it.
As we mentioned in the section on baselayers, the presence of water inside your layers is an almost sure-fire way to book yourself a bout of the chills and maybe even hypothermia. As such, the shell jacket and pants you use in winter need to be fully waterproof as opposed to merely water-resistant, and also highly breathable to ensure the moisture passing through your baselayer and midlayer can escape and evaporate on your shell layer’s surface.
In short:
This is your first and last line of defense against the elements — if it’s breached, the battle is all but over!
(So you’d better make sure it’s a good one.)
I can already hear your next question:
But what kind of jacket’s capable of providing such stellar all-round performance?
The short answer to the above is this: a great many of them.
The longer answer goes as follows:
Top-performing winter shells come in many shapes and forms. The best of them, however, usually boast a three-layer construction that sandwiches a waterproof/breathable membrane (such as those used by brands such as Gore-Tex, eVent, and PreCip) between an inner layer that wicks moisture from your body and protects the membrane from sweat, dirt, and grease, and an outer layer that protects the membrane from scuffs and scrapes whilst boosting waterproofing with a DWR coating.
While these membranes vary in their specifics, each performs admirably in terms of both waterproofing and breathability. The ratings that quantify the waterproofing and breathability capacities of outer layers are as follow:
Breathability
Breathability ratings are given as a figure followed by either g/m2/d or g/m2/24h (i.e. 5,000 g/m/d). In short, the higher the number, the more breathable a product will be. Most breathability ratings range between 10,000 and 20,000 g/m2/d. To give you an idea of how these figures translate into performance out on the trail, we’ve added a short description of what we can usually expect both ratings to deliver.
- 10,000 g/m2/d — While unlikely to be suitable for highly aerobic activities like ski-mountaineering, jackets with this breathability rating are usually better for colder conditions and activities that are normally more slow-paced or have frequent pauses (i.e. general hiking, snowshoeing, and ice-climbing).
- 20,000 g/m2/d — This rating usually appears in jackets that are made for fast-movers and more aerobic activities such as trail running. While capable of conducting most of the heat and water vapor your body produces outside in a hurry, jackets with this rating often compromise on waterproofing and windproofing to achieve their superior breathability. A notable exception to this rule is Gore-Tex’s Pro fabrics, which provide excellent waterproofing in combination with a 20K breathability rating.
Waterproofing
The waterproofing capacities of any shell layer are quantified in the hydrostatic head (HH) rating, which is given in millimeters (i.e. 10,000 mm). This figure reveals how much water pressure the material of any garment managed to withstand in laboratory tests before letting water penetrate — the higher the number, the more waterproof the fabric.
Below, we’ve added a quick guide to help you see how HH ratings translate into performance out on the trails and mountainside.
The bare minimum HH rating required for manufacturers to advertise their product as “waterproof” is 1,500mm, but garments with this rating are very rare and capable of dealing with only very short or moderate precipitation. The most common ratings found on outdoor garments range from 10,000m to 30,000mm:
[su_list icon=”icon: chevron-right” icon_color=”#ce6d39″]
- 10,000 mm — This relatively low waterproof rating is commonly found in many standard, everyday rain jackets or in high-performance jackets that place a greater emphasis on breathability as opposed to waterproofing. While many garments with this rating are ideal for high-intensity sports like trail running and ski-mountaineering, they probably won’t be able to deal with steady exposure to rainfall or snow.In short: not the best for winter-time backcountry adventures.
- 20,000 mm — 20k-rated garments provide a happy half-way house between the light waterproofing of 10k models and the virtually impregnable waterproofing of 30k models. Usually, jackets with this rating are most suitable for hikers who don’t expect to be in very extreme environments (such as those encountered in serious mountaineering) or require the high breathability often found in models with a lower HH rating.
- 30,000 mm — Usually the highest rating you’ll find on both pants and jackets, this rating denotes absolutely solid waterproofing that can withstand heavy, sustained showers, snow, sleet, hail, and pretty much anything else in liquid form you might wish to throw at it.
[/su_list]
Footwear
Depending on the conditions underfoot, many hikers could feasibly get away with a pair of standard, 3-season hiking boots while winter camping. If, however, the trail to your campsite is under more than an inch or two of snow and temperatures are below freezing, then shooting for a sturdier, better-insulated pair of four-season boots is highly recommended. Our favorite boots for any winter outings are the very warm, very reliable, and incredibly durable La Sportiva Nepal.
Accessories
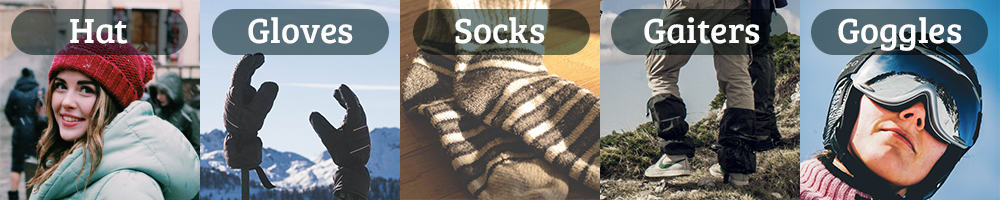
[su_spoiler title=”Hat” icon=”chevron” class=”accordion-header”]
A simple wool or synthetic beanie hat will usually do the trick, but make sure to try the hat on first to make sure it isn’t too itchy and that it’s big enough to cover your ears. In particularly blustery conditions, an old-school balaclava can work wonders in keeping the worst of the wind away from your face while protecting your ears and head at the same time.
[/su_spoiler]
[su_spoiler title=”Gloves” icon=”chevron” class=”accordion-header”]
For winter conditions, insulated gloves or mitts with a waterproof outer layer or at least a DWR (Durable Water Repellent) finish work best, providing enough warmth to stop your digits turning to icicles and enough weather resistance to keep out the wind, rain, and snow. Just in case you happen to get your gloves wet (easily done), we’d highly recommend always carrying a second pair.
[/su_spoiler]
[su_spoiler title=”Socks” icon=”chevron” class=”accordion-header”]
As with all items of gear, avoiding cotton is of the essence when choosing socks for your winter adventures. If your budget allows it, shoot for a pair of thicker merino socks and always carry a second pair in case of any mishaps.
[/su_spoiler]
[su_spoiler title=”Gaiters” icon=”chevron” class=”accordion-header”]
This often overlooked gear item is all but essential when hiking in deep snow in order to keep that snow where it belongs, i.e. outside your boots rather than inside them.
[/su_spoiler]
[su_spoiler title=”Goggles/Sunglasses” icon=”chevron” class=”accordion-header”]
Many hikers are apt to think that the cooler conditions found in winter mean there’s less need to protect their eyes from the sun. While this seems perfectly logical, the truth is that winter conditions are more conducive to eye damage due to the reflection of the sun’s rays on snow.
To keep your eyes well protected, we’d recommend a pair of glacier glasses with protective side panels to keep out reflections and with VLT (Visible Light Transmission) of about 0 – 30%. For those who envision encountering more extreme conditions, a pair of ski-goggles are a more practical option, providing more wind protection and preventing wind-blown snow from sneaking into your eyes via the gaps around the rim.
[/su_spoiler]
Winter Camping Gear
Tents
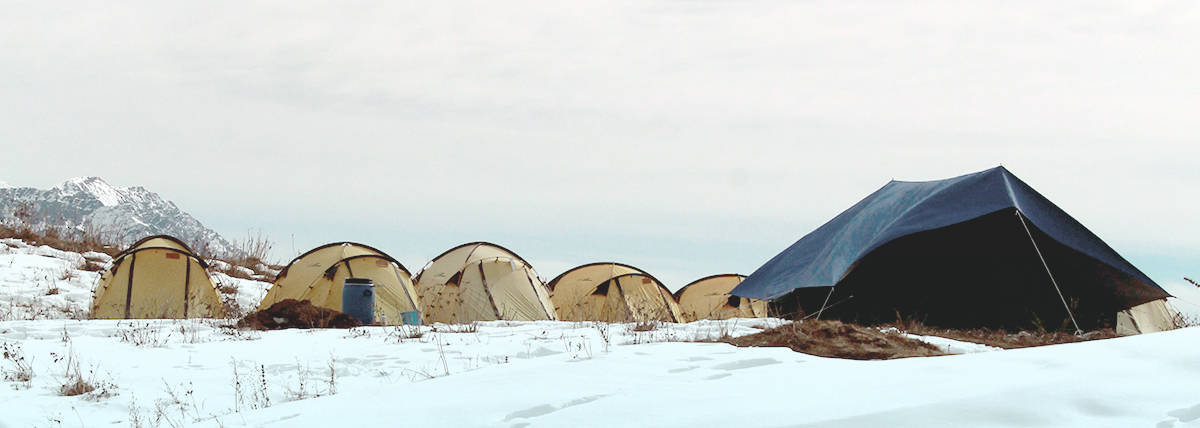
While many campers in warmer parts of the world could get away with using a 3-season tent for winter camping, for everyone else and to play things safe we’d recommend investing in a 4-season tent of the “bombproof” variety to ensure your trip doesn’t take a turn for the terrible in the middle of stormy night (or at any other time, for that matter).
So, what exactly makes a tent worthy of the designation “bombproof”?
Below, we’ll take you through the components and characteristics that make a tent a true backcountry castle in winter conditions.
Four-Season Rating
Four-season tents are, generally speaking, designed to withstand the worst conditions the weather gods can throw at you even when in their most mischievous and malignant moods.
On the whole, four-season tents are distinguished from the three-season variety by their heavier weight, highly durable fabrics, stronger poles, and use of fabrics that provide superior and more reliable waterproofing and windproofing.
As with waterproof jackets, hydrostatic head rating is important in gauging a tent’s weather-resistance, but it doesn’t give us the full picture – as explained in the following, quirky little video:
Size
For the most part, winter camping gear (sleeping bags, mats, and clothing) is bulkier than the gear we use throughout the rest of the year. As such, those keen on getting into winter camping should seriously consider investing in a more sizable tent — in terms of floor area and headroom — to make things more comfortable. If you happen to get snowed in or otherwise trapped inside waiting for the foul weather to clear, a few extra square feet will make life a lot more bearable and maybe save you from the ills of “cabin fever”. As a rough guide, somewhere around 40 square feet is a reasonable space for two people.
Durability
Tough conditions call for tough builds. Strong winds, accumulations of snow, and driving rain are just a few of the potential assailants of your tent in winter months that add to the regular wear and tear it can be exposed to at other times of the year. Withstanding the efforts of these aggressors in the long-term usually means choosing a tent that’s built with heavier fabric — usually in the 60 to 80-denier range. Sadly, such hard-wearing tents tend to be heavier and more expensive than models built for less extreme environments but, as the old saying goes, you don’t want to take a knife to a gunfight…
Weight
With the exception of mountaineering models intended for use on airy perches on the edge of cliffs and high mountain ridges, winter tents tend to be much heavier than their three-season counterparts. In most cases, however, this additional weight translates directly into enhanced weather protection, added floor space and headroom, and all-in-all a build more able to withstand the rigors of exposure to harsher environments and conditions.
If you plan on camping near the trailhead or where you park the car, heavier “basecamp” varieties are your best bet for protection and spaciousness, but if you’re likely to be traveling long distances on foot before pitching up, “alpine” or “treeline” models will likely save you a few pounds of pack weight (but also shave off a few square feet of space).
Features
[su_list icon=”icon: chevron-right” icon_color=”#ce6d39″]
- Doors – While one-doored tents are adequate for solo campers, if camping in a group of two or more then a second door will save you the inconvenience of being crawled over or stood on by your partners if they need to leave the tent during the night (and facing their ire if you have to do so yourself).
- Vestibules – Large vestibules make for ideal changing rooms in the morning when your partners are still sleeping and also provide a sheltered, safe spot to do your cooking.
- Storage – Given the amount of kit you’re likely to be taking with you while winter camping, having a few places where you store more important items is a very handy and welcome feature.
[/su_list]
Sleeping Bags
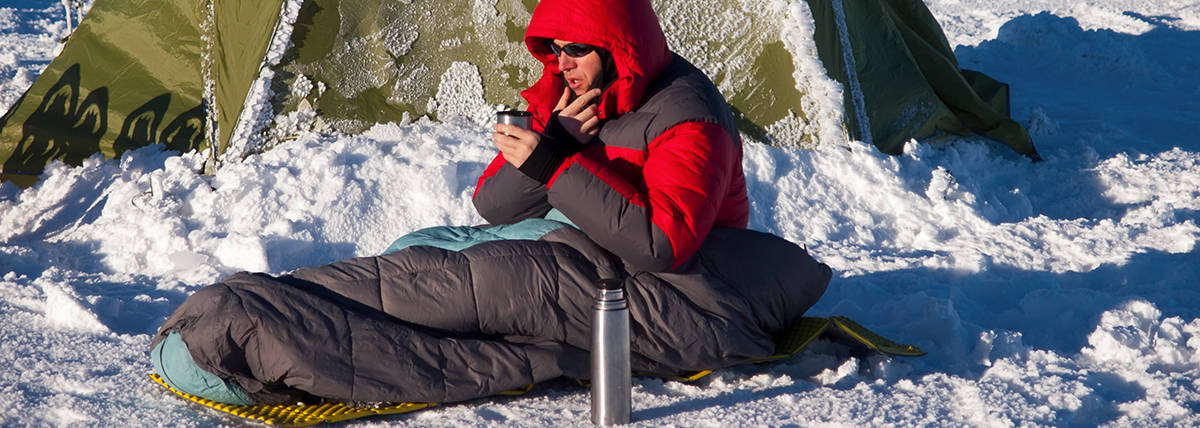
One expression you are highly unlikely to ever hear from winter camper is “Gee, I wish I’d brought a sleeping bag that wasn’t quite so warm.” Winter, indeed, is no time to be messing around when it comes to taking care of your well-being, and the first and most significant step towards doing that is kitting yourself out with gear that cuts will cut the mustard at the time when temps are lowest and you need it most: night-time.
While winter sleeping bags can be a touch on the heavy and expensive side, this is one item of kit you really don’t want to scrimp on — if you do, you might not simply be signing yourself for a very uncomfortable and sleepless night but maybe even a dose of hypothermia (or worse).
When shopping for your winter sleeping bag, be sure to pay particular attention to these features and characteristics:
Season Rating/Comfort Rating
In the product description of most sleeping bags, would-be buyers are provided both a season rating and a comfort rating. Season ratings are fairly straightforward, with a 2-season bag being suitable for summer conditions in most parts of the world, 3-season bags adequate for shoulder-season overnighters, and 4-season bags built to let you enjoy a satisfactory slumber when temps drop closer to, or below, freezing.
But it ain’t quite so simple…
Many manufacturers will advertise their product as “4-season” on account of its water-resistant properties or sometimes even just to boost sales, while in reality the lowest temperature at which their sleeping bag should be used is equal to or significantly higher than bags given a 3-season rating by more reliable (and honest) brands.
To avoid falling foul of the above misinformation and marketing trickery, we’d recommend going by the temperature ratings, which are usually given in three figures: low, comfort, and high.
[su_list icon=”icon: chevron-right” icon_color=”#ce6d39″]
- Low — The absolute minimum temperature at which the sleeping bag should be used.
- Comfort — The temperature at which the sleeping bag is designed to provide a comfortable night’s sleep.
- High — The highest temperature at which the sleeping bag will remain comfortable. Even if you think there’s a chance that the temperatures where you are heading may surpass the ‘high’ rating, you can always cool off by making use of every sleeping bag’s built-in AC — a.k.a. the zipper! — when need be.
[/su_list]
Insulation Type
The materials used in your sleeping bag go a long way to determining its best usage, practicality, and overall suitability for winter camping.
The most common types of insulation used in sleeping bags are down and synthetic materials, both of which have several advantages and disadvantages.
Down Insulation Vs. Synthetic Insulation
Traditionally, down products have been the preferred choice of outdoors-goers due to their excellent warmth-to-weight ratio and small pack size but snubbed by others owing to their high price and inability to provide insulation when wet. Recent “waterproof down” bags have solved the latter problem but only exacerbated the former one by using water-repellent finishes that add a small handful of $ to the original variety’s price tag.
Synthetic sleeping bags are usually slightly bulkier and heavier but also cheaper and boast the added bonus of insulating even when wet. Although down has long been considered the best insulation type for sleeping bags, more and more synthetic sleeping bags that give down products a serious run for their money performance-wise are now beginning to appear on the market.
The bottom line?
The insulation type you choose will ultimately come down to personal preference, the amount of weight you’re willing to carry, and your budget. If money’s no issue, we’d opt for a down bag with a high fill and then do everything we can to ensure we keep it dry (buying a waterproof stuff sack’s a good start!).
Design and Size
Many hikers harbor a few misconceptions above how insulation actually works. Rather than actively providing heat, an insulating layer (such as a sleeping bag or jacket) provides warmth by keeping in the heat produced by your body. This being so, the sleeping bags that provide the best insulation are usually those in the “mummy-style” design with a hood that pulls over your head and can be cinched closed over your face. This leaves a gap that allows you to breathe without difficulty but less room for cold ambient air to enter and undo the good work of the insulating fabric. Some standard rectangular sleeping bags, on the other hand, offer a great deal of meaty insulation, but let themselves down with an entry/exit opening at the top of the bag which can let in frigid air while you (try to) sleep, particularly if you tend to be a tosser and turner.
Sleeping bags normally come in two sizes — standard (S) and long (L). For people under six feet, standard bags usually provide ample room; for those over six feet an ‘L’ is a safer bet. Another point worth noting is that if you tend to feel the cold more than most, then you might benefit from shooting for a larger bag size, thereby leaving yourself enough space to throw on an extra layer or two of clothing when hitting the sack on particularly chilly nights.
Sleeping Mat/Pad
A thick, comfortable sleeping pad can make a huge difference to your night’s sleep while winter camping. No matter how cozy your sleeping bag or how good your tent, all their goodness and insulation will go to waste without the addition of a substantial, supportive buffer that lifts you above the freezing ground and stops it sucking the warmth from your body like a smoothie through a straw.
When buying a sleeping pad a few factors need to be taken into consideration to make sure you get the best your money can buy, most notably thickness, R-Value, length, and width.
Thickness
Generally speaking, the thicker your pad is the better it will be for winter camping. Not only do thicker pads lift you further from the ground and reduce the potential for parts of your body to come into contact with it as you shift your weight throughout the night, but they’re also usually the most comfortable. As a general rule, a winter sleeping pad should have at least three inches of loft for normal sleepers and as much as five for side sleepers, who are more likely to put added pressure onto the pad in certain points (at the hips and shoulders).
R-Value
A sleeping pad’s ability to insulate isn’t wholly determined by its thickness. To get the full picture, we have to look at its R-value, which takes into account all the factors — materials, loft, design — that influence a pad’s insulating capacities and quantifies them with a number rating from 1 to 5+. As you might have guessed, the higher the number, the more insulation the pad provides against the cold ground or snow beneath your tent.
For winter camping, we’d highly recommend plumping for a pad with a rating of at least 4 — any less and the chances are you’ll be in for some very long, cold, sleepless nights.
Length & Width
While length is a serious consideration if you happen to be particularly tall, far more important to your pad’s suitability for winter camping is its width. If you’re a back sleeper, then your arms are likely to fall off a standard, narrower pad during the night, leaving them exposed to the chilly air rising through the floor of your tent. If you’re a tosser and turner, then the same fate could await your whole body!
Safety
Avalanche Awareness
Those venturing into the mountains or hillier portions of backcountry to do their winter camping need to be aware of the risks posed by snow conditions and be able to take appropriate action to both avoid being caught in an avalanche and to carry out avalanche rescue if and when need be.
Although we would highly recommend taking a course in avalanche safety, the following are a few basic tips to get you started:
Get the Right Gear
Avalanche safety gear is essential to anyone who wants carry on hiking throughout the winter months. While there are lots of gear items that you could add to your kit to make things more convenient and safer, the following are the true essentials:
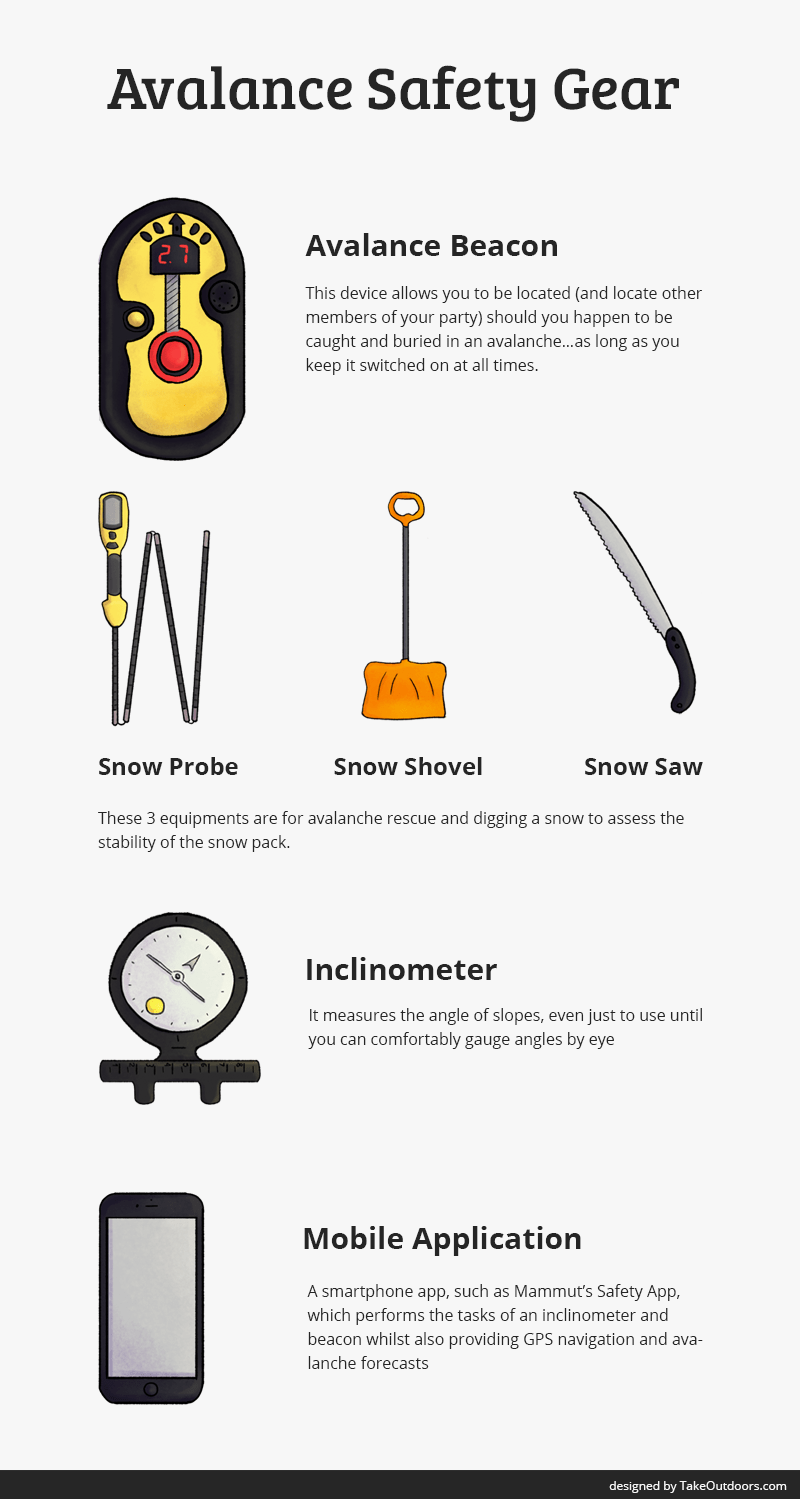
Check avalanche forecasts for you area
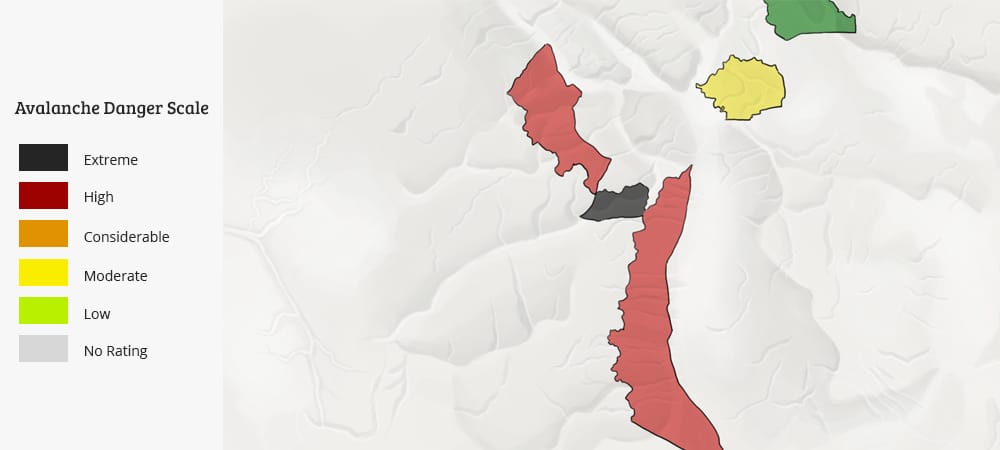
Most mountainous zones around the globe provide avalanche forecasts. If possible, try to cross check one forecast with another and, if the reading’s high, staying at home is the best bet if your trail is likely to cover steeper, avalanche-prone ground. Here’s a good place to start!
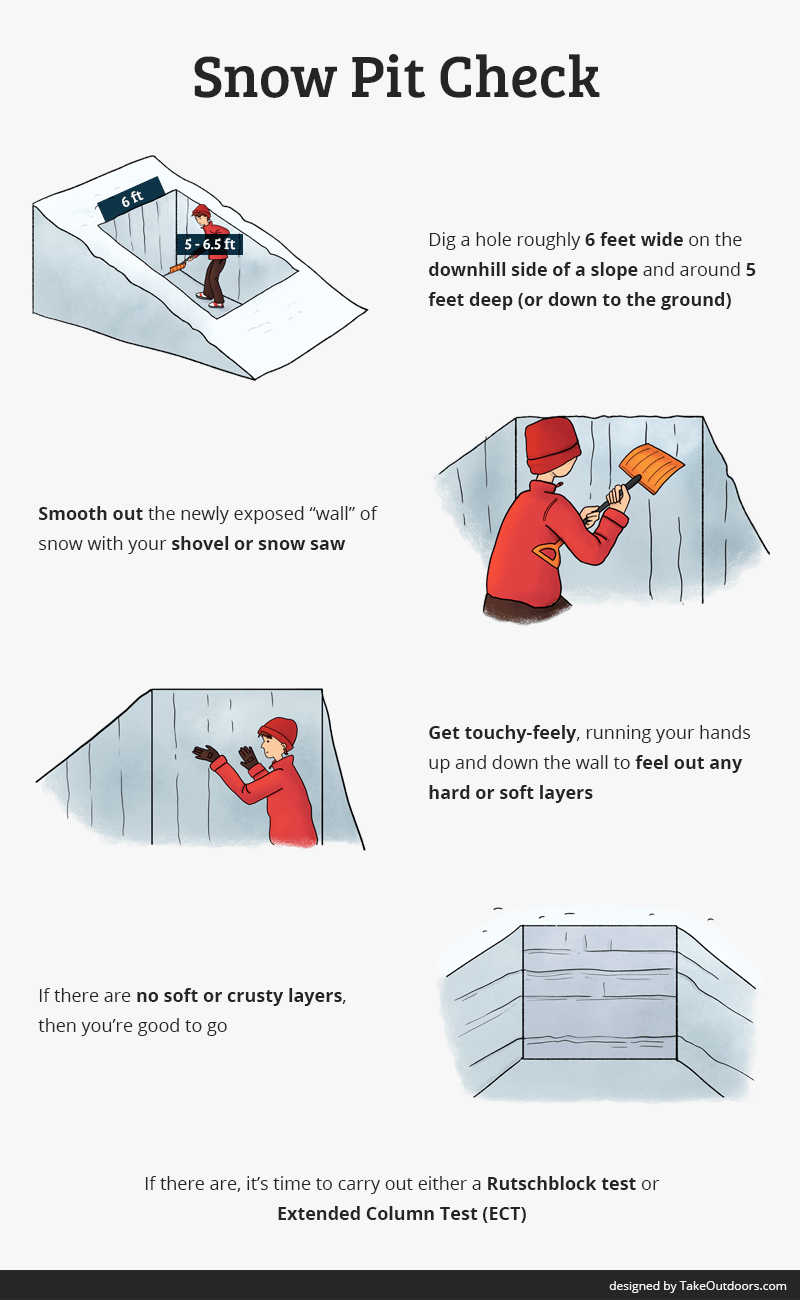
Dig a snow pit
Digging a snow pit is a simple means of assessing the stability of the snowpack, and it’s much easier to do than it may appear.
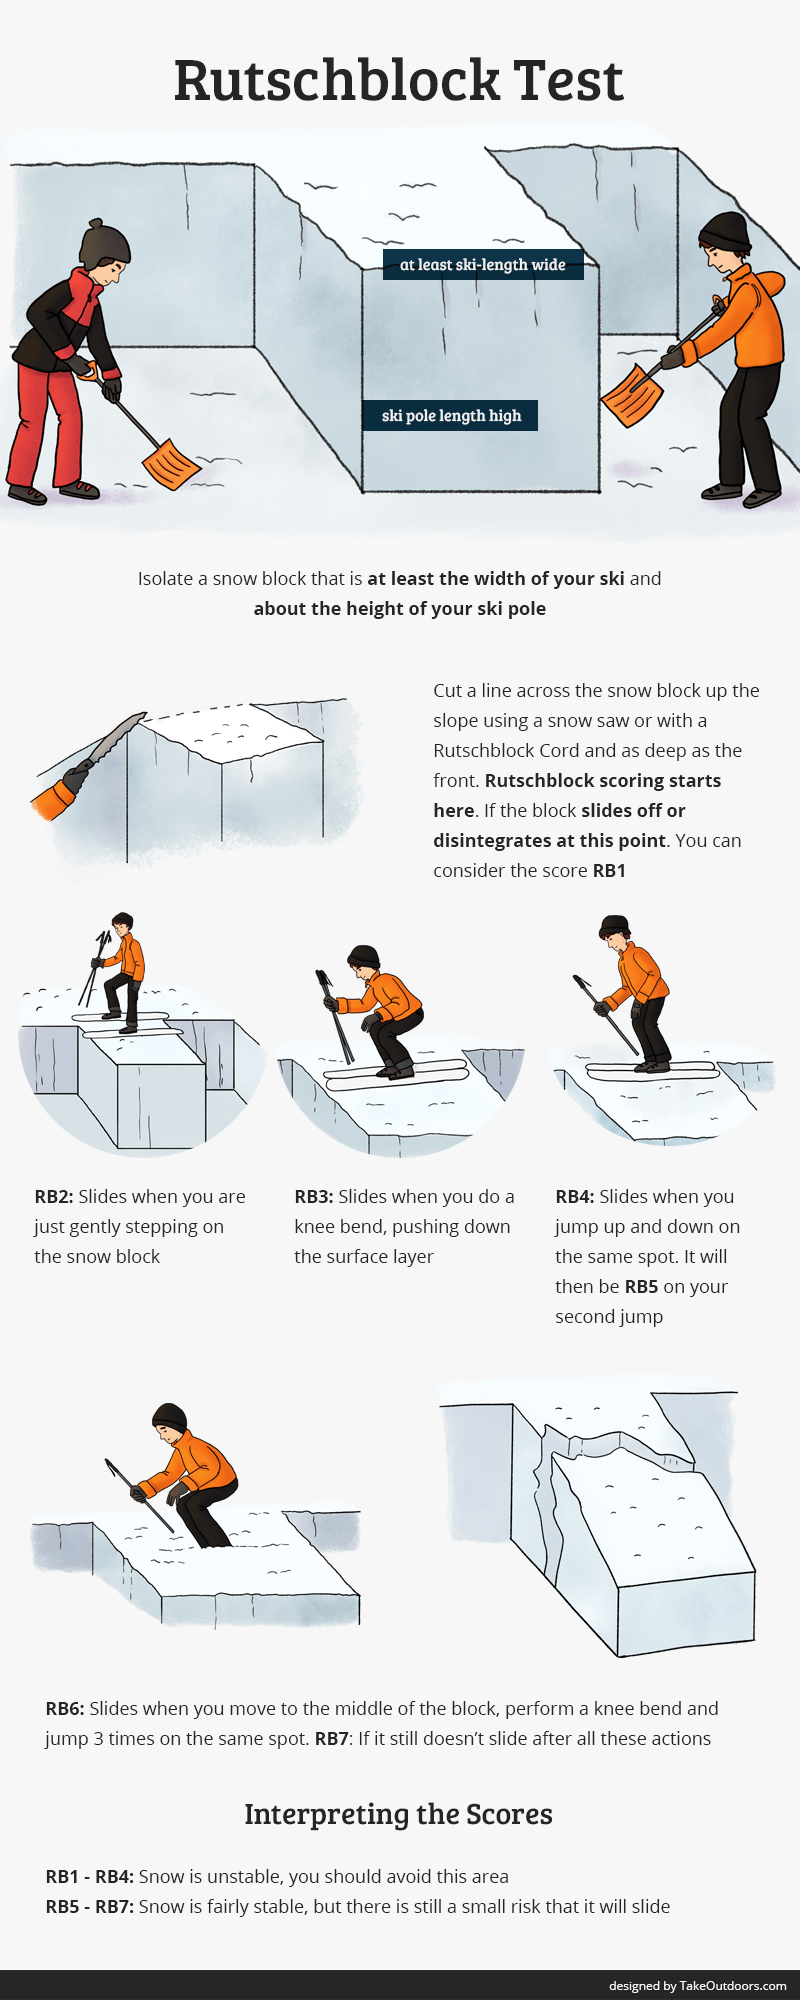
Rutschblock Test
If your initial tests of the snowpack turn up a few crusty or soft layers, then the next step is the Rutschblock or Sliding Pack test, with which you can gauge how much pressure is required to make the snow on any given angle of slope slide.
Here’s how it’s done:
Extended Column Test (ECT)
An easier alternative to the Rutschblock Test, the ECT allows you to assess but the stability of the snowpack’s layers and gauge the size of any potential avalanche that may occur on slopes with a similar aspect and angle.
Here’s how it’s done:

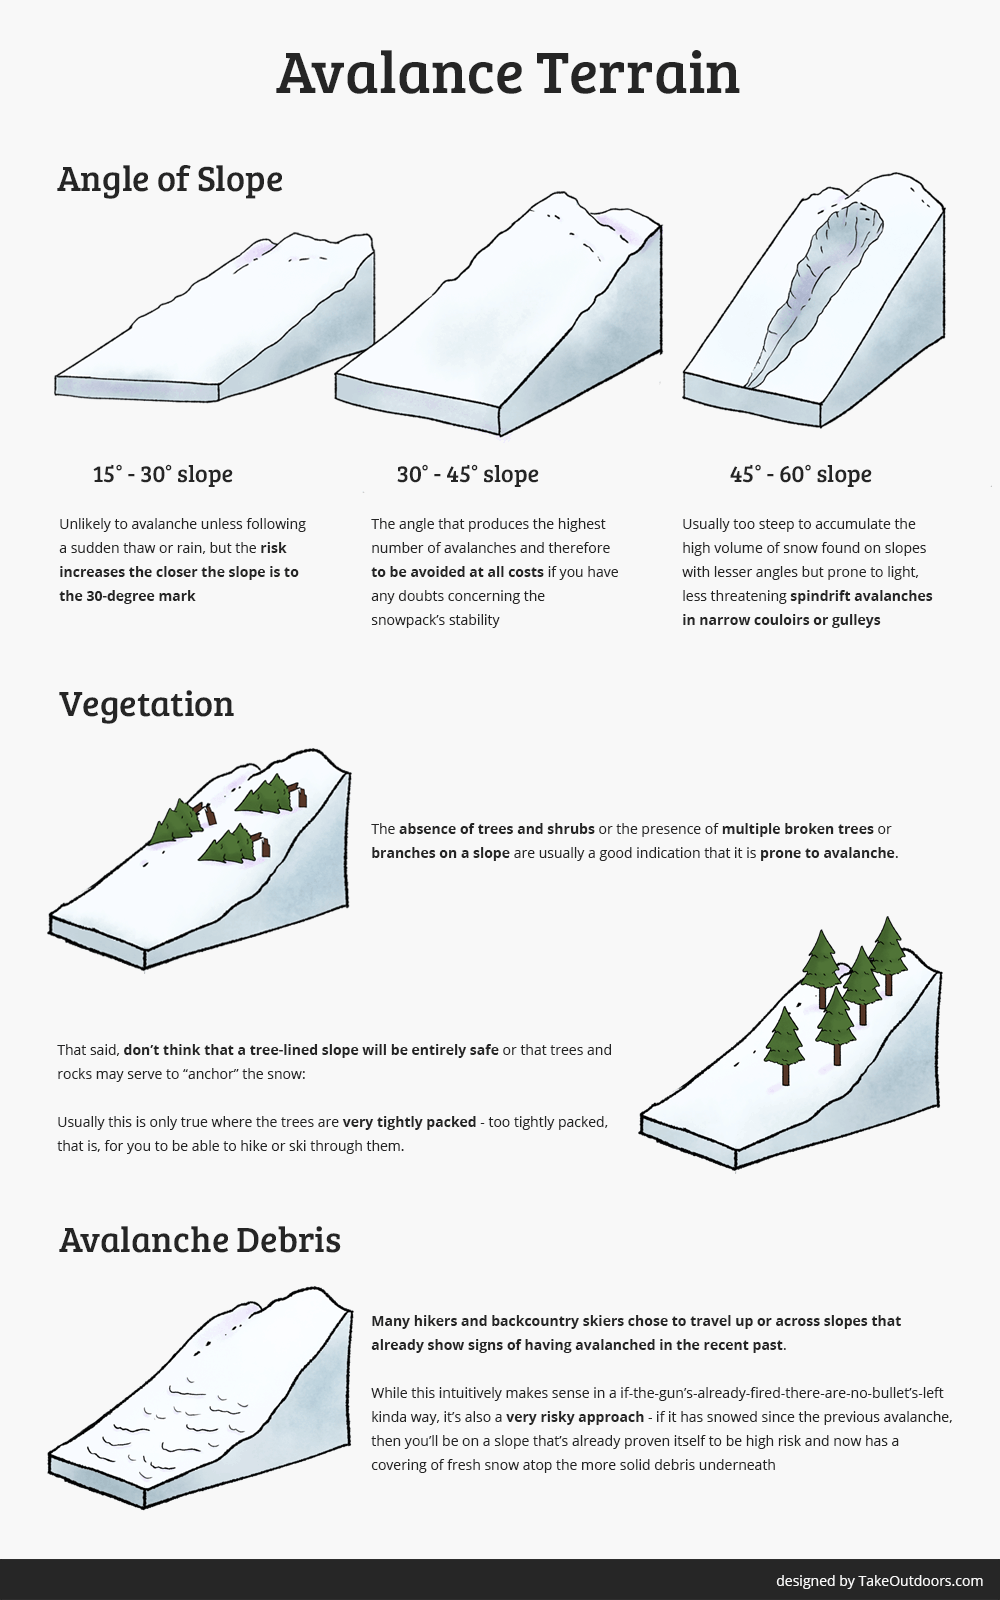
Identifying Avalanche Terrain
Identifying avalanche-prone terrain is a tricky business because different angles and aspects of slope will be more or less likely to slide under certain conditions and a number of variables can come into play.
Curb Your Enthusiasm
Many winter hikers are apt to overlook the risks involved in traveling in avalanche territory and let their eagerness to complete their chosen route take them into terrain they know to be sketchy.
Our advice? Curb your enthusiasm. It may be a Saturday, the sun may be shining, and all else may be in top condition for a wonderfully fun winter wander, but if the snow conditions aren’t with you, every other factor in the day’s favor count for precisely zero.
In short, any day is a better day to go hiking, snowshoeing, or skiing than a day when the avalanche risk is above normal.
Cold-Related Injuries and Illnesses
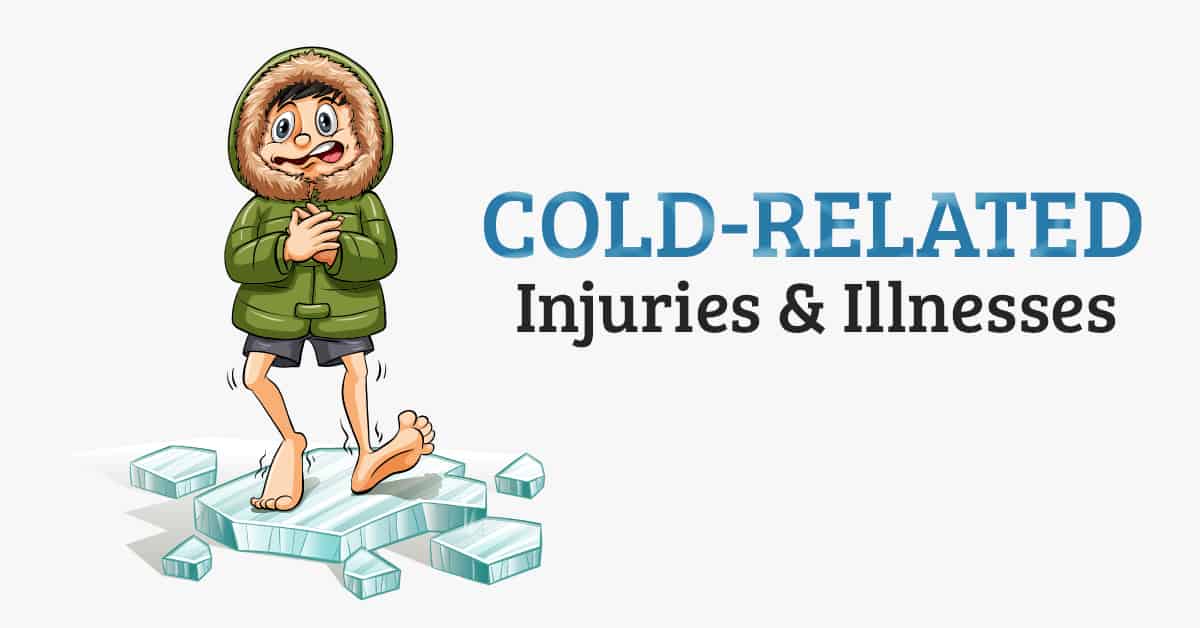
Frostbite
Frostbite is the result of the freezing of bodily tissue and most commonly occurs on the fingers, toes, and ears.
Symptoms of Frostbite
[su_list icon=”icon: chevron-right” icon_color=”#ce6d39″]
- Waxy and pale skin
- Pain, tingling, or numbness
- Soft-feeling skin if partially frozen
- Hard, wooden-like feel if fully frozen
- The formation of blisters after thawing in more serious cases
[/su_list]
How to Treat Frostbite
Frostbite occurs in three stages: frostnip, superficial frostbite, and deep frostbite.
[su_list icon=”icon: chevron-right” icon_color=”#ce6d39″]
- Frostnip
This is the mildest form of frostbite, and symptoms can be alleviated by gently warming the affected area and covering any exposed skin. An old mountaineer’s trick is to place frostnipped feet or fingers in your armpits or between your partner’s legs. Although the intuitive response of most is to try to rub heat into the affected area, this is highly likely to damage the tissue in the affected area. If possible, try to restore warmth with lukewarm (not hot) water. - Superficial and Deep Frostbite
This is diagnosed by the failure of treatment for frostnip mentioned above, and the appearance of blisters in and around the affected area. Should this happen, your only recourse is to get to a hospital as soon as possible. One point well worth noting is that reheating frostnipped areas can worsen the situation if the area is then exposed again. This being so, only begin to treat frostnipped or frostbitten areas if you’re sure you will be able to avoid a recurrence before finding your way to safety.
[/su_list]
Hypothermia
Hypothermia occurs when the body’s core temperature drops below 95F/35C (normal body temperature is 98.6F/37C). Hypothermia can strike at any time of year, but in winter the odds are especially high due to the cooler ambient air and humidity. Moderate cases of hypothermia can be treated in situ, but more severe symptoms require hospitalization and can, in very extreme cases, result in death.
Symptoms of Hypothermia
[su_list icon=”icon: chevron-right” icon_color=”#ce6d39″]
- Shivering
- Confusion, changes in mood
- Poor coordination
- Disorientation
- Slurred speech
- Weak pulse
- Drowsiness
- Loss of consciousness
[/su_list]
How to Treat Hypothermia
[su_list icon=”icon: chevron-right” icon_color=”#ce6d39″]
- Limit your exposure to wind, rain, snow, and cold as much as possible and take cover
- Remove wet clothing and replace it with dry clothing
- Eat and drink (hot stuff if possible) — this not only increases diet-induced thermogenesis (DIT) but also gives your body the energy required to shiver, which is its natural way of attempting to generate heat
- Wrap yourself (or the stricken team member) in an emergency blanket
- If the above measures prove futile, it’s time to call the emergency services or get the stricken member of your team to a hospital as soon as possible
[/su_list]
Snow Blindness
Snow blindness is essentially sunburn on the cornea of your eyes. In winter conditions, hikers are at increased risk of snow blindness due to the reflection of the sun’s ultraviolet rays on snow. Although snow blindness normally self-heals after 1-2 days and only very rarely causes permanent eye damage, even a mild dose can be very scary, cause extreme pain, and have far more serious knock-on effects with regard to navigation and walking to safety under your own steam.
Snow Blindness Symptoms
[su_list icon=”icon: chevron-right” icon_color=”#ce6d39″]
- Pain in the eyes (usually several hours after first exposure to the sun)
- Watery and bloodshot eyes
- Swelling around the eyes
- Itchy sensation in the eyes
- Blurry vision
- Sensitivity to light
[/su_list]
How to Treat Snow Blindness
[su_list icon=”icon: chevron-right” icon_color=”#ce6d39″]
- Avoid the temptation to rub your eyes
- Place cool, damp compresses over the eyes to cool them down
- Take painkillers
- Use gauze bandages to cover the eyes and ensure they are not exposed to more sunlight
[/su_list]
How to Prevent Snow Blindness
[su_list icon=”icon: chevron-right” icon_color=”#ce6d39″]
- Wear sunglasses that do not allow any sunlight or reflections to enter around the rims — glacier glasses, goggles, wraparound sunglasses work best
- Choose darker lenses with a low level (less than 40%) of Visible Light Transmission (VLT)
- Keep your sunglasses/goggles on even when there’s substantial cloud cover — UV rays can penetrate cloud and low cloud can actually intensify the sun’s rays due to the effects of diffraction
- If you happen to lose your glasses, wear a peaked cap if you have one and/or improvise a pair of emergency goggles by either wrapping a bandana, scarf, or shirt around your head and leaving small openings for your eyes or by cutting eye holes in a piece of cardboard and securing it to your face with tape or string, leaving the “flaps” from the holes in place to provide shade for your eyes
[/su_list]
Ethical Winter Camping
Many of the ethical considerations that apply to winter camping are the same as those for the rest of the year. Below, however, we’ve included a short list of ethical actions specific to winter.
- Dispose of gas canisters responsibly at the appropriate recycling facility.
- Never cut branches from live trees. Period.
- Never bury trash in the snow.
- Take care to avoid camping on fragile vegetation in shallow snow.
- Urinate at least 200 feet from any streams or lakes (no matter how frozen) and plan to carry out scat in durable plastic bags — just because you can cover it with snow doesn’t mean it isn’t there and doesn’t pose the same threat to nearby water sources.
- Biodegradable items such as orange peel and banana skins will decompose far more slowly in sub-zero temps and thus leave a longer-lasting blemish on the landscape — pack them up and carry them out.
- Only start campfires where permitted by local laws or park area regulations.
- Respect wildlife: approaching wild animals can cause them to use up the already depleted energy reserves that they require to survive the winter.
Got all that? Great! To round things off, let’s finish up with a comprehensive list of tips that can make your winter camping trips a whole lot safer, less stressful, and more fun than you could ever have imagined.
Top Tips for Successful Winter Camping
- Use gear that’s fit to task — we’ve said it before, but it’s a point well worth reiterating.
- Leave your route with someone back home. In the event of an injury or weather-related incident, this way rescue services will be able to locate you and that little note will become your lifeline
- Don’t let yourself get cold before taking action — staying warm is far easier than getting warm once you’ve allowed your core temperature to drop.
- Pack plenty of firewood if headed to a tree-free area (or when deadwood is likely to be damp or buried in snow).
- Choose a suitable and safe spot to pitch your tent — that is, one that’s far from any slope that might avalanche, sheltered from the wind, and not under any trees (snow-laden branches have a tendency to fall off — being under a big one when it does so equals big trouble).
- Provide your camp with further wind protection by building a small wall with snow or pitching up next to a natural wind block such as a cluster of trees, a large boulder, or a hollow in the terrain.
- Stomp down the snow before you pitch your tent to avoid a squidgy — and uncomfortable — foundation for your tent.
- Make sure your camping spot is in a location that will catch the sunrise.
- Stay hydrated and eat plenty to help you stay warm — your body generates heat in the process of digesting food.
- Bring extra items for your extremities (gloves, hat, socks) in case of loss or saturation by water.
- If your hands are cold despite wearing gloves, this is usually a sign that your core temperature is low and you need to throw on another top layer, not that you need an extra or better pair of gloves.
- Wear a pair of glove liners underneath your insulating gloves or mitts so you can perform more delicate tasks without exposing your skin.
- Leave sharp items like ice axes, crampons, and snowshoes outside the tent or in the vestibule — a small rip in your tent could spell disaster in especially harsh conditions.
- Before going to bed, eat a snack and do a quick bit of exercise (star jumps, running on the spot, push-ups) to heat yourself up — if you go to “bed” cold it’s likely you’ll remain that way for most of the night.
- Bring enough fuel to allow you to melt plenty of water.
- Bring a pee bottle (seriously…) to save having to get out of the tent in the middle of the night to answer nature’s calls.
- Invest in a set of snow stakes — standard tent stakes or pegs are all but useless in the white stuff.
- While hiking, limit your breaks to a few minutes at a time to avoid cooling down excessively.
- Use bottles instead of hydration bladders — the tubes on the latter are apt to freeze over and, thus, deprive you of your hydration. Water freezes from the top down, so by stowing bottles upside down you can prevent the bottle’s lid from freezing over and refusing to open.
- Invest in a sleeping bag liner to boost the warmth of your sleeping bag.
- Choose your fuel wisely — liquid fuel works well in freezing conditions but is heavy and slower; butane is lighter and more energy-efficient but can stop working in slow temps (easily overcome if you’re brave enough to bring it into your sleeping bag with you at night!); propane is good down to -43F but burns fairly quickly.
- Bring matches and stow them in a waterproof bag. If that fails, grab yourself a chunk of ice and see if you can’t get your fire going with that (see this page for details).
- Consider using a sled if you’re carrying a particularly heavy load.
- Invest in snowshoes if hiking/camping in an area where snow cover is particularly deep.
- Carry batteries close to your body and take them into your sleeping bag with you at night — cold temperatures can sap battery power in a hurry.
- Use a groundsheet to boost insulation and spread extra items of clothing across the floor of your tent to provide an added buffer while moving around inside.
- Bring everything into the tent with you — not only will this stop it freezing, but also give you less space to heat with your body temperature.
- Bring a hot water bottle — this small addition to your kit can make a big difference at bedtime.
- Carry an emergency blanket/shelter — this very light, cheap addition to your kit could be a lifesaver should things go seriously awry.
- Never, never, never do any cooking inside your tent or use your stove as a heat source — doing so could easily result in carbon monoxide poisoning.
- Go home. Seriously…go home. If conditions are awful and you’re having a lousy time, rather than rough it out and risk losing your appetite for winter camping (or suffering a serious injury or illness), pack up your gear and make a beeline for civilization. The hills, mountains, and wilderness aren’t going anywhere and will be there when you return!
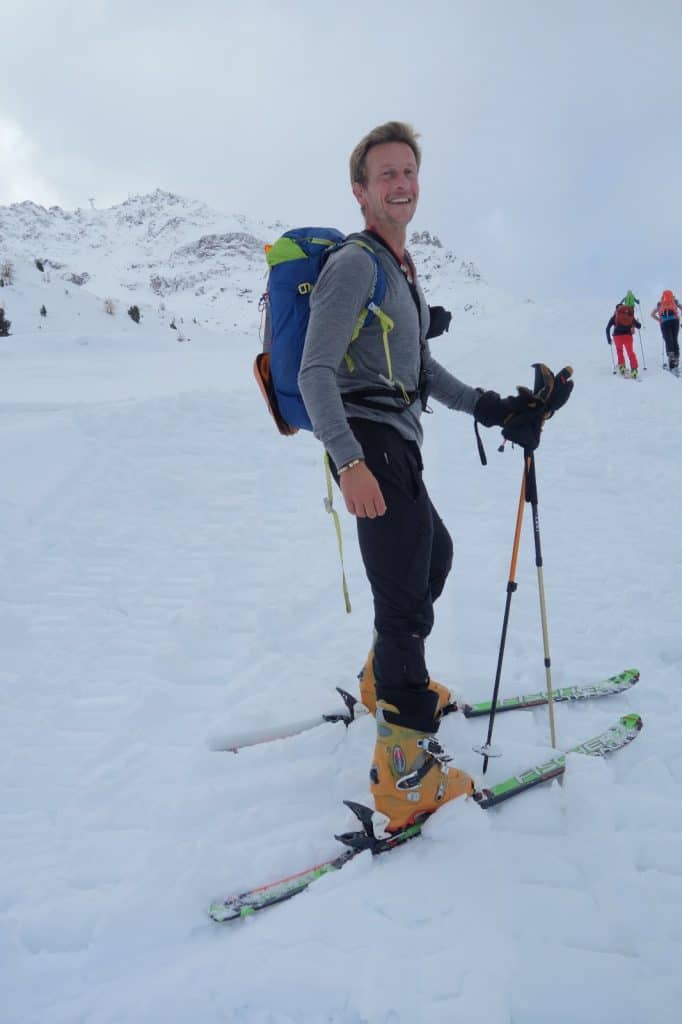
Kieran James Cunningham is a climber, mountaineer, camper, and all-round lover of all things wild and wonderful. He’s climbed a handful of 6,000-meter peaks in the Himalaya, 4,000ers in the Alps, and 14,000-footers in the Rockies and currently lives in the Italian Alps.